Example 5: Creating a summary view
In this example you will create a view that reads the order item files, then calculates the total number of products per order and the total price of the order. This view requires a format phase to be defined, which will do the summarisation. For this example you will copy and modify the view created in Example 1.
- Open the CustomerOrders view by double-clicking the view listed in the Metadata List Area
- Select File > Save As
- In the New Name field type CustomerOrdersSum, and click Save
- The View Properties screen, where you can modify information that applies to the whole view.
- The View Editor screen, where you can define specific data transformations.
- press F9,
- or click the Show Grid / Properties button in the Editor area toolbar.
This view will aggregate records for each order, so records must be sorted by the order ID. The format phase does the sorting and aggregating, and requires a sort key to be defined.
Modify the view to include a format phase with aggregation.
- Toggle to the View Properties screen.
- On the General tab click Format-Phase Output with Fixed-Width Fields (under Default Output Format).
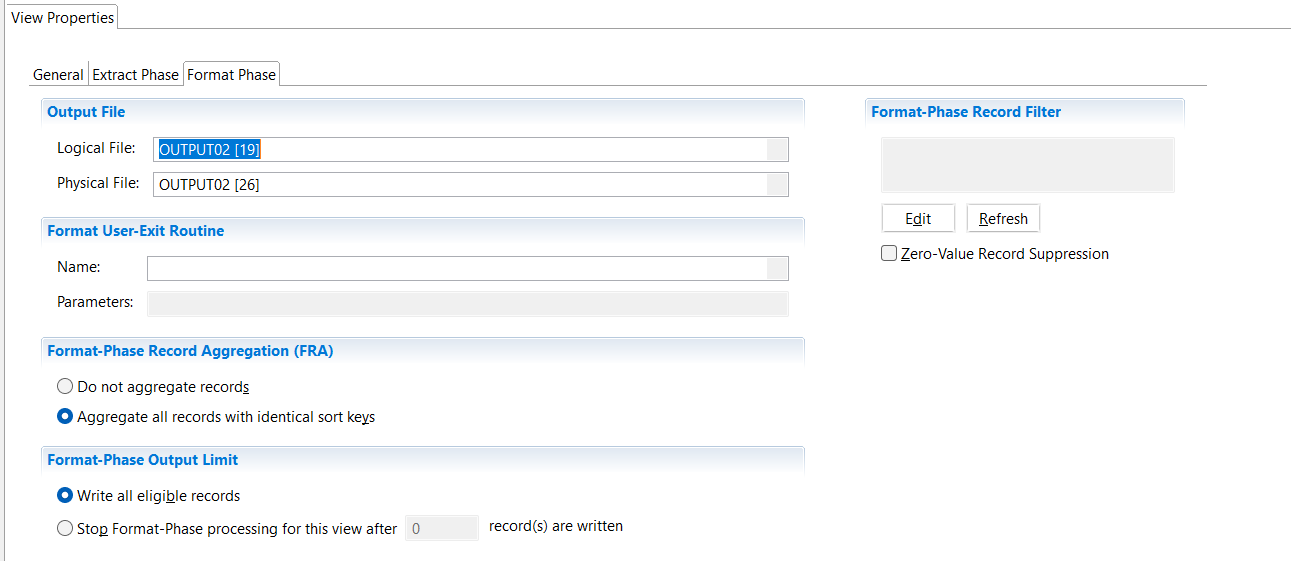
A new tab will appear labelled Format Phase. - On the Format Phase tab click Aggregate all records with identical sort keys (under Format-Phase Record Aggregation (FRA)).
Define the ORDER_ID as the sort key.
- Toggle to the View Editor screen.
- Select the column with the column source ORDER_ID.
- Select Edit > Make Sort Key.
- Save the view File > Save.
Define the columns.
Delete the PRODUCT_DESC column and the DISCOUNT column, if they have been added previously from Example 3 and Example 4.
- Select the column with the column source PRODUCT_DESC
- Select Edit > Delete
- Repeat for the column DISCOUNT
Add ORDER_PRICE column
- Select the last column by clicking on the column header.
- Select Edit > Insert Column After
or insert a new column using the buttons in View Editor toolbar. - Click the green cell at the bottom of the new column.
The Column Source Properties frame opens on the right. - From the Column Source Type list, select Column Logic
- To create and edit the column logic click in Column Source Value, click the icon on the right side
 .
.
This opens the Extract-Phase Column Logic tab (ECL tab) in the Editor Area.
Opening the ECL tab also opens the Logic Text Helper, which enables you to place keywords, field names, and column numbers into logic for column assignment.
-
Add the following logic.
COLUMN = {QUANTITY} * {PRICE}
- Save the Column Logic File > Save.
- Close the Extract-Phase Column Logic tab.
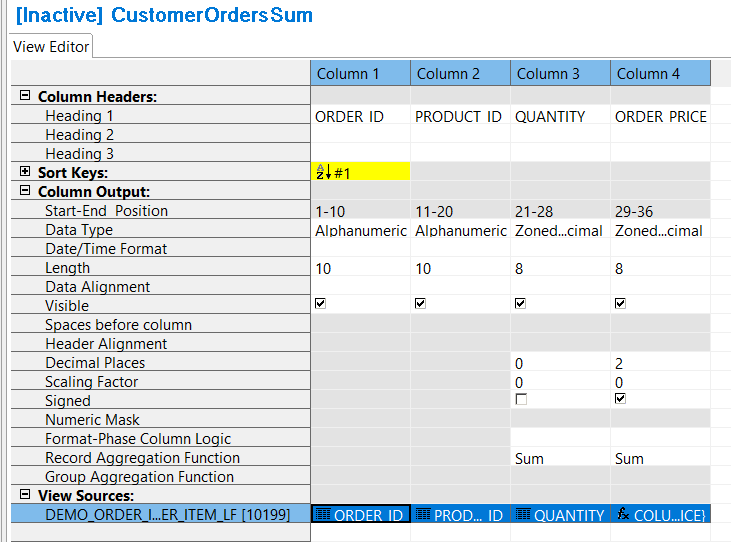
Change the Data Type to Zoned Decimal with Length 8, and add a column header.
All the following applies to the column just added:
- Click on the Data Type cell, and select Zoned Decimal from the list.
- Click on the Length cell, and type 8
- Click on the Decimal Places cell, and type 2
- Click the Signed cell to indicate signed
- Click on the Header 1 cell for this column, and type ORDER_PRICE
- Save the view File > Save

Notice that the Record Aggregation Function cell has changed to Sum for the numeric columns.
Adding Output destination
Summary views have two phases - the extract phase and the format phase. The extract phase writes to an extract file with DD EXTRnnn where nnn is the extract phase file number.
See View Properties tab > Extract Phase tab > File Number.
The default output destination for the format phase is the DD Fnnnnnnn where nnnnnnn is the view ID. For example, if the view ID is 12183 the default DD name for the format phase is F0012183.
You can specify your own output destination. To do this for a Format-Phase view:
- Toggle to the View Properties screen.
- Select the Format Phase tab.
- From the Output File > Logical File list select OUTPUT02
- From the Output File > Physical File list select OUTPUT02
- Save the view File > Save

For more information on how to define your own logical file and physical file definitions look at Create LR, LF, and PF metatdata in Advanced Features.
Activate the View
To activate the view, use any of these methods:
- Select Action > Activate
- Press the Activate icon on the View Editor toolbar
- Press F5
The view title bar now displays the word “Active”. Save the view again to preserve this active state. The view is now ready to be run.
For more information on summary views see Overview of Views and Create Views.