Create Summary View
TABLE OF CONTENTS
- Create a summary view - Delimited Field output
Create a summary view - Delimited Field output
To create output that is delimited, the format phase is required. To define a view that will write delimited output:
Add new view definition
- Select Administration > New > View from the menu.
- The View Properties screen, where you can modify information that applies to the whole view.
- The View Editor screen, where you can define specific data transformations.
- press F9,
- or click the Show Grid / Properties button in the Editor area toolbar.
The first screen presented is the View Properties screen, which contains the sub-tab General.
- In the Name field type a descriptive name.
- In the Control Record field select the control record. See Date Processing Functions for an explanation of how Control Records are used.
- Select the Default Output Format required. This will affect the other sub-tabs available to you. For this case, a summary view with delimited output, select Format-Phase Output > Delimited Fields.
- You can select an output LR to pre-define columns by using Create View based on Output Logical Record. This option is only available before the first save. It could be useful if the output of this view is to become the source of another view via a pipe or a token.
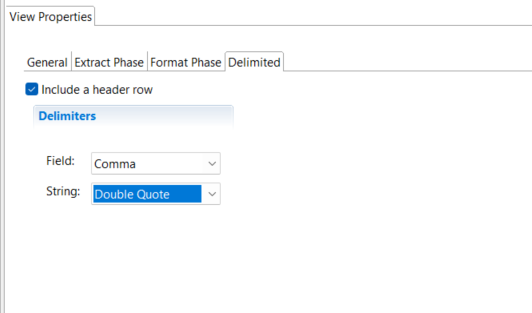
- Select the View Properties sub-tab Delimited.
If a header row is required, tick Include a header row. The header text is added when defining the columns.
To choose the character to delimit the fields, select from the Field drop down menu.
To choose the character to enclose a string, select from the String drop down menu.
- Save the view File > Save
When you save a new view, the view ID is assigned by the Workbench and is not editable.
Other options on the Format Phase tab and the Extract Phase tab are described in sections below.
Specify view source
Next specify the view source. You must have already defined the physical files, logical files and logical records definitions for the source you want to specify. Note that this is the same process for Extract-phase only views and summary views.
For information on how to define your own logical record, logical file and physical file definitions look at Create LR, LF, and PF metatdata in Advanced Features.
- Toggle to the View Editor screen.
- Select Edit > Add View Source
Alternatively, you can Right Click on View Sources then select Add View Source - In the pop-up window use the drop down arrow to select the Logical Record, and the Logical File you require. Click OK.
Add columns
Next define the output layout by adding columns to the view. The columns contain the characteristics of the output such as data type, the length, and the alignment, such as left, right, or center. They can also contain constants, logic and lookup fields.
- Select Edit > Insert Column After
or you can insert a new column using the View Editor toolbar in the top right of the Editor Area. The arrow icons are used to insert new columns, or to move columns.
A new column is added to the grid. - Click the green cell at the bottom of the new column.
The Column Source Properties frame opens on the right. - From the Column Source Type list, you can select Column Logic, Constant, Lookup Field or Source File Field.
- The following depend the Column Source Type selection
- For Column Logic:
To open the Extract-Phase Column Logic editor, click on the icon in Column Source Value
 - For Constant:
Type the constant value in Column Source Value - For Lookup Field:
Select the target Lookup LR from the drop down list.
Select the Lookup Path from the drop down list.
Select the Lookup Field from the drop down list.
Click anywhere in the Column Source Properties panel, and the properties of the selected field will be filled in. - For Source File Field:
Select the field from the Column Source Value drop down list.
Click anywhere in the Column Source Properties panel, and the properties of the selected field will be filled in.
- For Column Logic:
After filling in the Column Source Properties, you can select the Column Output properties. For example you can specify in the column properties the Data Type, any Date/Time formatting, data alignment etc.
For more information on the column types see Column Assignment, Data Types, Lookup Paths, and Extract-Phase Column Logic.
You can add as many columns as you want, but be aware of the output record length. Each column displays the start and end position in the output record.
Header row
If a header row is required for the delimited output file, then
- Select the View Properties sub-tab Delimited.
- Tick Include a header row.
- Select the View Editor screen.
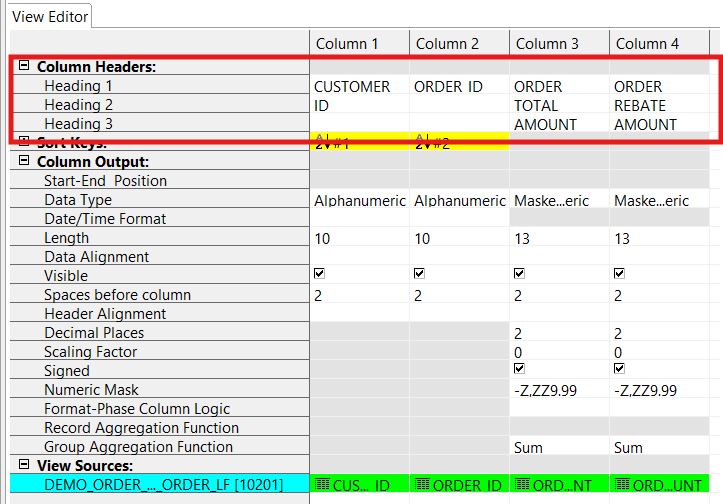
- Define the header text in the cells Heading 1, Heading 2 and Heading 3.
For column types Source File Field and Lookup Field, the column heading value defaults to the heading value in the logical record. If there is no heading value in the logical record, the field name is used. You can over type this value as needed.
The text in the three column header cells will be concatenated with a space placed in between. Each header section has a maximum of 48 characters.
Add sort keys
Summary views require at least one sort key, and can have up to 5 sort keys defined. The sort keys are based on view columns. You must define the column first, then assign it as a sort key.
To define a column as a Sort Key,
- Select the View Editor tab.
- Select the column by clicking any cell in the column.
- Select Edit > Make Sort Key
- The Sort Keys cell for the column will be highlighted in yellow and show the sequence number of the sort key. Click the yellow cell and the Sort Key Properties frame will open on the right.
- The Sort Sequence can be changed from the default Ascending to Descending here.
- Save the view File > Save
Multiple columns can be assigned as sort keys. The columns do not need to be in order since the numbers within the yellow cells indicate which column will be sorted first, second, third, and so on. The arrows within the yellow box indicate whether the column is sorted in ascending or descending order.
To unassign a column as a sort key,
- Select the View Editor tab.
- Select the column by clicking the column.
- Select Edit > Make Non-Sort Key
- The Sort Keys cell for the column will be greyed out.
- Save the view File > Save
Specify Format-Phase column logic
Format-Phase Column Logic can be applied to non-sort key numeric columns within summary views.
To specify the logic text, double-click in the Format-Phase Column Logic cell for the column.
This opens the Format-Phase Column Logic tab (FCL tab) in the Editor Area. Opening the FCL tab also opens the Logic Text Helper, which enables you to place keywords and column numbers into logic for column assignment.

Note that the cell will be grey, and can not be selected, if the column is data type Alphanumeric, the column is a sort key, or there is no format phase defined.
For more information see Format-Phase Column Logic and Format-Phase Column Logic reference.
Output destinations
Summary views have two phases. The extract phase writes to an extract file EXTRnnn where nnn is the File Number.
This is defined on the View Properties screen > Extract Phase sub-tab > File Number.
The default File Number is 1, so the default file name is EXTR001. If you are planning to create many summary views to run in the same pass, you may require the extract phase to write to different extract work files. If you change the File Number you will see that the WRITE statement changes in the Extract-Phase Record Logic View Source Properites > Record Logic.
The default output destination for the format phase is the DD Fnnnnnnn where nnnnnnn is the view ID. For example, if the view ID is 12188 the default output file for the view is F0012188.
You can specify your own format phase output destination.
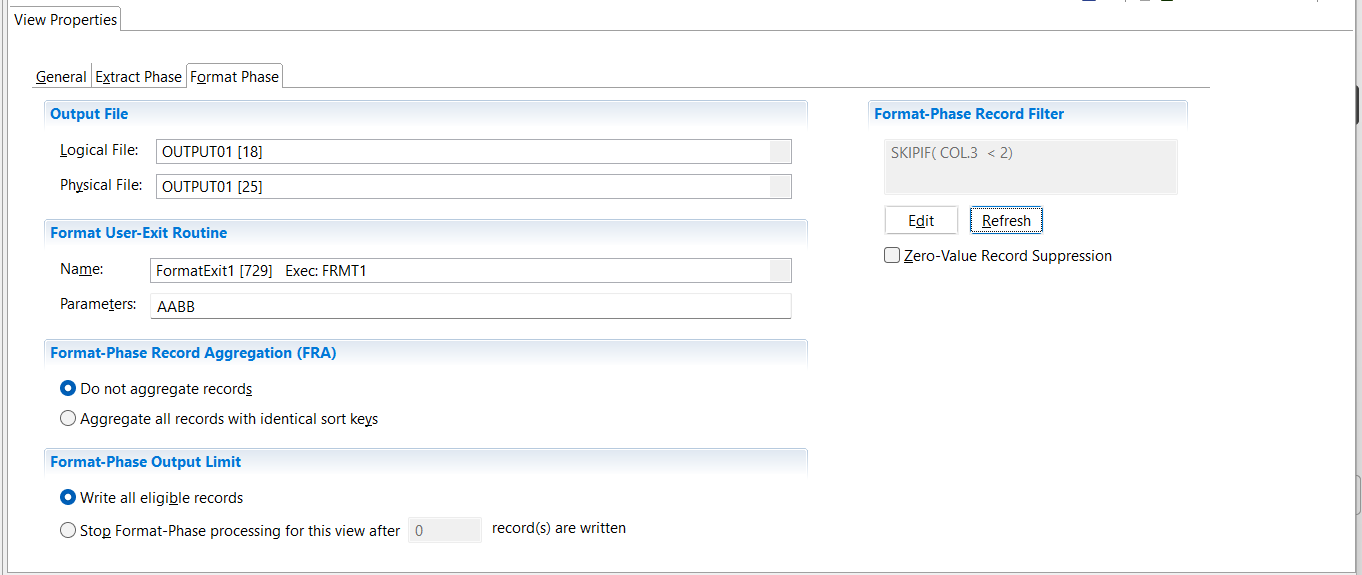
- Select the View Properties sub-tab Format Phase.
- From Output File > Logical File list select the LF you want to write to.
- From Output File > Physical File list select the PF you want to write to.
- Save the view File > Save
Write User Exits
At the extract phase you can specify that each extract record is passed to a Write User-Exit. To do this:
- Select the View Editor tab; you can use the toggle button or F9, if required.
- Left click on the View Sources blue cell. This opens the View Source Properties tab in the Metadata List Area.
- From the Extract-Phase Output > Write User-Exit Routine Name list select the User-Exit you want to be called.
- In the field Extract-Phase Output > Parameters You can specify up to 32 characters to be passed to the User-Exit.
- Save the view File > Save
You will see that the WRITE statement in the Record Logic field has changed.
Note that after the Write User-Exit had processes the extract record it has a choice of passing it back to GenevaERS to write to the extract file, or not. See User exits for more detail.
Extract Record Logic
You can also replace the WRITE statement with Extract Record Logic.
- Tick the Override default Record Logic? box.
- To create and edit the Extract Record Logic click in the Record Logic field displaying the default WRITE statement, then click the icon on the right side
 .
.
This opens the Extract-Phase Record Logic tab, which enables you to add conditional logic and WRITE statements. For example you may want to have logic that directs some output to one extract file and the rest to another extract file, depending on some condition. - Save the view File > Save
See Extract-Phase Record Logic for more details.
Define filters
The view can contain logic to filter input records at extract-phase time, and also filter output records at format-phase time. See overview of record filters and create record filters.
Specify aggregation
Views with delimited output can write all records, or can specify aggregation and collapse the output data based on sort keys. If the data is to be aggregated,
- Select the View Properties sub-tab Format Phase, and click Format-Phase Record Aggregation (FRA) > Aggregate all records with identical sort keys.
If aggregation is selected you have the choice to select column aggregation functions.
Specify column aggregation functions
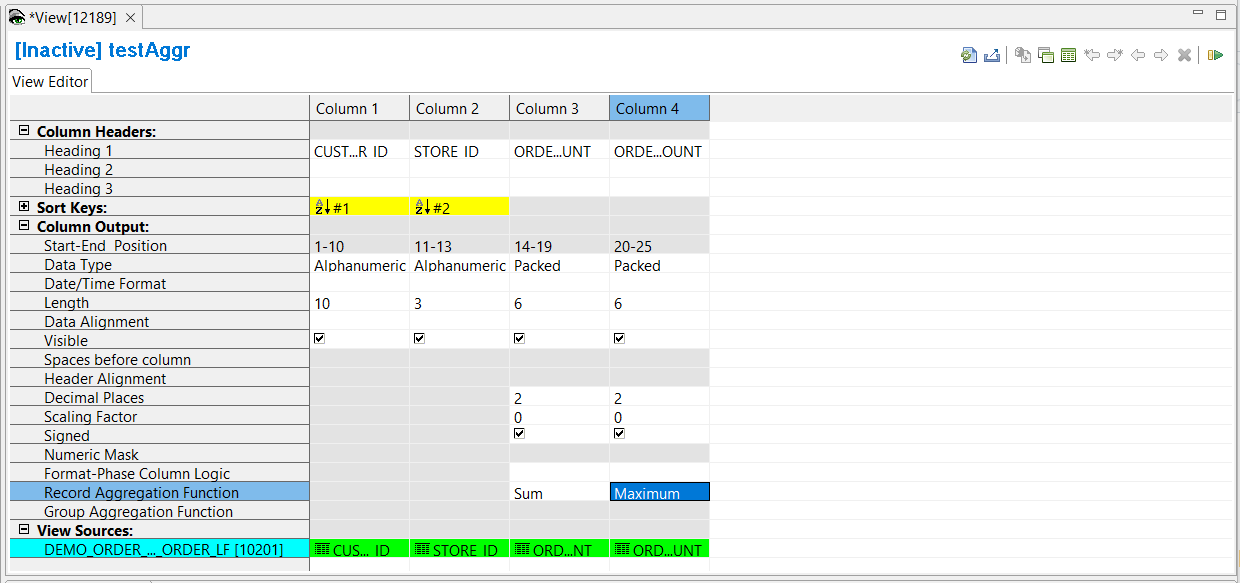
Aggregation is performed in the format phase, only on non-sort key columns with a numeric data type. You can specify the type of aggregation for each column: Group Calculation, Maximum, Minimum, Sum (default).
To specify the type of subtotaling, double-click in the Record Aggregation Function cell for the column, and select the function from the drop-down list.
- Maximum returns the maximum column value for each unique sort key value.
- Minimum returns the minimum column value for each unique sort key value.
- Sum returns the sum of the column values for each unique sort key value. Any Format-Phase Column Logic is performed before aggregation i.e. on every extract record.
- Group Calculation returns the sum of the column values for each unique sort key value. Any Format-Phase Column Logic is performed after aggregation i.e. on the summarized record.
Note that the cell will be grey, and can not be selected, if the column is data type Alphanumeric, the column is a sort key, there is no format phase defined, or Format Record Aggregation is not selected for the view.
Extract Phase tab options
Select the View Properties sub-tab Extract Phase.
1) Extract-Phase Record Aggregation (ERA) Note: This option is only available if Format-Phase record Aggregation is selected.
- Select Do not aggregate records for no aggregation of output records at extract-phase time.
- Select Aggregate records with identical sort keys using a buffer of n records to aggregate records with identical sort keys using a buffer with a limit of the n field. The n value is a positive integer up to 9 digits. The default for the n value is 4000.
For a description of ERA see Extract-Phase Record Aggregation Overview.
2) You have the option to limit the number of output records written with the Extract-Phase Output Limit.
- Select Write all eligible records to ensure that all eligible records are output. This button is selected by default.
- Select Stop Extract-Phase processing for this view after n records are written to stop the processing of this view after n records are written. The n value is a positive integer up to 9 digits. The default for the n value is 100.
3) File Number is used to manage the intermediate extract file name. See Output destinations for more details. The default is 0.
Additional Format Phase tab options
Select the View Properties sub-tab Format Phase.
The Output File option is described in Output destinations above.
You have the option to specify a User-Exit routine to be called during the format phase:
- Select Format User-Exit Routine > Name
Select a User-Exit Routine from the drop down list. All the routines are of type Format. Sort the list by clicking on “id” or “name” in the header of the list. Reverse the sort order by clicking again on “id” or “name” in the header. - Select Parameters to specify input data for the user-exit routine. This can be up to 32 characters.
You have the option to limit the number of output records written with the Format-Phase Output Limit.
- Select Write all eligible records to ensure that all eligible records are output. This button is selected by default.
- Select Stop Format-Phase processing for this view after n records are written to stop the processing of this view after n records are written. The n value is a positive integer up to 9 digits. The default for the n value is 100.
The Format-Phase Record Filter option is described in Define filters above.
To avoid output of records with zero in all numeric fields, tick the Zero-value Record Suppression box.
Activate the View
The view must be activated before the Performance Engine can process it. Activation invokes the compiler which reports errors and warnings.
To activate the view, use any of these methods:
- Select Action > Activate
- Press the Activate icon on the View Editor toolbar
- Press F5
When the view is active, save it to preserve this active state. The view is now ready to be run.