Create Extract-only view with source-record layout
TABLE OF CONTENTS
Another type of Extract only view is a copy view. This view has no columns as the output layout is the same as the source record layout. The view can still define record filters and output record logic.
Define view
To define a copy view:
- Select Administration > New > View from the menu.
- The View Properties screen, where you can modify information that applies to the whole view.
- The View Editor screen, where you can define specific data transformations.
- press F9,
- or click the Show Grid / Properties button in the Editor area toolbar.
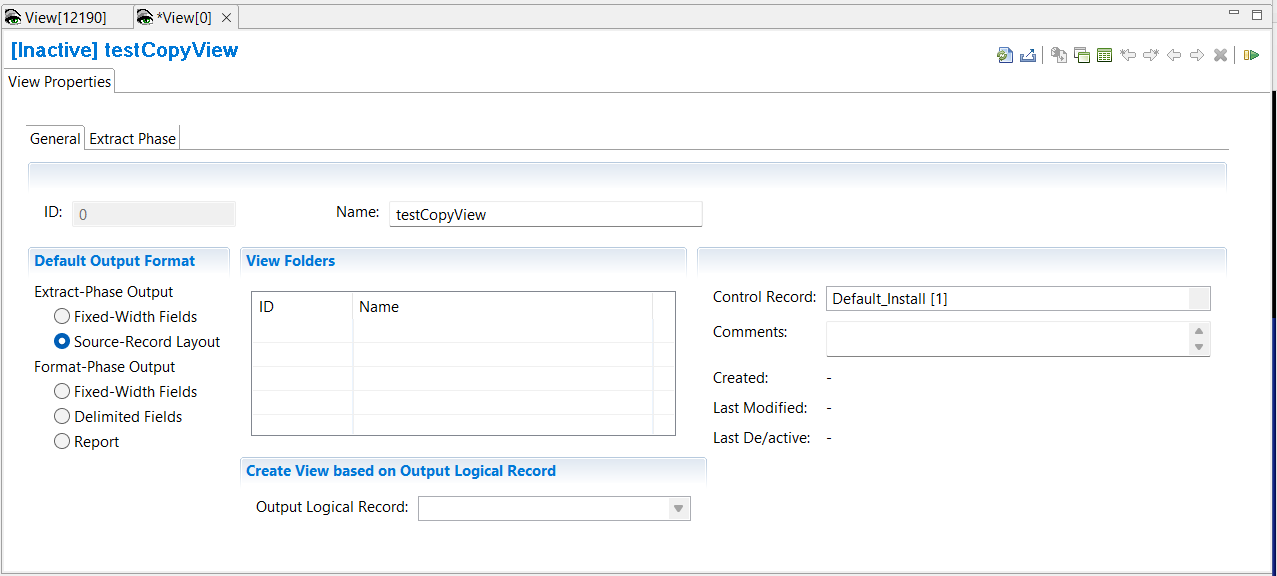
The first screen presented is the View Properties screen, which contains the sub-tab General.
- In the Name field type a descriptive name.
- In the Control Record field select the control record. See Date Processing Functions for an explanation of how Control Records are used.
- Select the Default Output Format required. This will affect the other sub-tabs available to you. For this case, an Extract only copy view, select Extract-Phase Output > Source-Record Layout.
 Note that ‘Create View based on Output Logical Record’ is not selectable in this case.
- Select the View Properties sub-tab Extract Phase. Here you have the option to limit the number of output records written with the Extract-Phase Output Limit
- Save the view File > Save
When you save a new view, the view ID is assigned by the Workbench and is not editable.
Specify view source
Next specify the view source. You must have already defined the physical files, logical files and logical records definitions for the source you want to specify. Note that this is the same process for Extract-phase only views and summary views.
For information on how to define your own logical record, logical file and physical file definitions look at Create LR, LF, and PF metatdata in Advanced Features.
- Toggle to the View Editor screen.
- Select Edit > Add View Source
Alternatively, you can Right Click on View Sources then select Add View Source - In the pop-up window use the drop down arrow to select the Logical Record, and the Logical File you require. Click OK.
Output destinations
The default output destination for Extract-Phase only Views is the DD Fnnnnnnn where nnnnnnn is the view ID. For example, if the view ID is 12183 the default DD name for Extract-Phase only Views is F0012183.
You can specify your own output destination. To do this:
- Left click on the View Sources blue cell you added earlier. This opens the View Source Properties tab in the Metadata List Area.
- From the Extract-Phase Output > Logical File list select the LF you want to write to.
- From the Extract-Phase Output > Physical File list select the PF you want to write to.
- Save the view File > Save
You will see that the WRITE statement in the Record Logic field has changed.
You can also replace the WRITE statement with Extract Record Logic. For example you may want to have logic that directs some output to one file and the rest to another file, depending on some condition. See Extract-Phase Record Logic for more details.
Define a filter
The view can contain logic to filter input records at extract-phase time. See overview of record filters and create record filters.
Activate the View
The view must be activated before the Performance Engine can process it. Activation invokes the compiler which reports errors and warnings.
To activate the view, use any of these methods:
- Select Action > Activate
- Press the Activate icon on the View Editor toolbar
- Press F5
When the view is active, save it to preserve this active state. The view is now ready to be run.